Computer Tips and Tricks
Get the latest posts via rss
Showing posts with label 7. Show all posts

Monday, 21 June 2010

How to inject LAN drivers into WDS Server BOOT images

We use WDS (Windows Deployment Services) to image large numbers of computers. Lately we have been using a Windows Server 2008 R2 WDS server with a Windows 7 boot image. However several times we have found that newer PCs/Laptops (manufactured after Windows 7) have trouble PXE booting in to the Windows 7 boot image, due to the lack of LAN drivers.
We found that these drivers need to be "injected" in to the boot image (a .WIM file) to enable the PC/Laptop to be imaged using WDS. After several attempts we found the following procedure worked quite well to achieve this.
Before You Start
  • You’ll need a full install of WAIK (Windows Automated Installation Kit,) as it contains the necessary tools to manage WIM files. This can be done on any system, but if you’re running WDS it is best to perform the injection on the WDS server.

Saturday, 20 March 2010

Using Large external USB Drives on XBOX 360


Like millions of other PC users I have hundreds of video files that I have created or acquired over the years. These are always available to me to play on my computer any time I like. However, on occasions I like to kick back and watch these on my big screen TV.

I can do this in several ways. Burn the files to DVD and play them though my DVD player, which is a waste of discs and RW's tend to be unreliable. I could connect my computer to my TV via a HDMI cable or use the Media Centre Connector on my XBOX 360. However both requires my Computer to be running and in the Media Centre option, my Xbox as well, along with my TV. My computer is pretty hefty and uses a 750 WATT power supply. It is NOT light on the electricity bill.

My alternative option is to use an External USB Hard drive from the USB port on my XBOX 360 console and navigate with my Media Centre Remote Control.

Wednesday, 10 March 2010

Simple File backup with Robocopy

One of the main issues when using any computer is regular backup of your precious data to protect against corruption and accidental deletion. Microsoft has always provided their "Windows Backup" utility and it is generally very good for full system backups and restores.

But what if you want to backup just your personal data or certain files or folders and not others? What if you just want to restore one particular file? There are plenty of third party tools that will do the job, but some can be rather expensive. Besides, why buy what you already have.

Supplied in Windows Vista, 7, Server 2008 and Server 2008 R2, as well as the previous resource kits is a utility called "Robocopy." This is a small command line based tool (a bit like XCopy) that can be scripted and configured with exceptions, to copy selective data either once or on a schedule and even write to a comprehensive log file.

Monday, 21 December 2009

Enable Windows 7 Administrator Account GPO

By default, as was with Vista, the local Administrator account in windows 7 is disabled. If you are deploying Windows 7 across a number of clients on a network etc. you may find the need to enable this account for future trouble shooting client machines. Also remember, even if you enable the Administrator account, and then run Sysprep, the sysprep process disables the Administrator account.
By far the easiest way to enable the Administrator account on client machines in a domain is to use Group Policy, here is how you achieve this.
I am assuming you have the basic understandings of applying/creating Group policy settings on a Windows Domain, if not, leave a comment and i will see how i can help further.
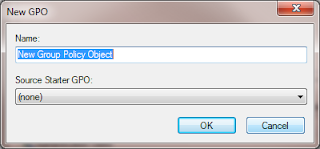
Go ahead and open “Group Policy Management”, for testing purposes, it may be worth creating a new policy on a test OU, and placing some test client accounts within that OU. So Right click your OU and select “Create a GPO in this domain, and Link it here”. The new GPO pox will prompt you for a Name, so go ahead and give it a meaningful Name, and click OK.

Thursday, 17 December 2009

Creating a Windows 7 Sysprep unattended XML

Having successfully sysprepped Windows 7, i thought i would break down the processes required into some smaller blogs, so here goes for creating the required unattended XML file.
To create the unattended XML you will need the latest version of WAIK (Windows Automated Installation Kit) and you can download that from the Microsoft Download centre here.
Once you have downloaded and installed WAIK, go ahead and launch Windows System Image manager, and you will be presented with the following


Tuesday, 8 December 2009

Configure Windows 7 64 Bit & Media Direct on Dell XPS M1530

Last year I treated myself to a nice new Dell XPS M1530 Laptop.

Specification: Intel Dual Core Duo 2 2 GB CPU, 2 GB of RAM, 250 GB HDD, 256 MB Graphics, Blue Tooth, Wireless, Finger print reader etc.


It came with the dreaded Windows Vista Home Premium 32 Bit. By this time I had already used Vista at work and was NOT a fan. It was slow and clunky, used way too many system resources and was full of annoying bugs.

Admittedly Vista Service Pack 1 did solve a few of these issues and Vista ran smoothly on the XPS M1530.

Thursday, 26 November 2009

Configure Windows 7 - XP Compatibility Mode

Here is a great way of having the latest Microsoft Windows 7 Operating System but still being able to use your old Windows XP software that wont run on Windows 7.

Create a Virtual PC

Available in Windows 7 Professional, Enterprise and Ultimate (32 and 64 Bit) is the Windows Virtual PC add in. This will run on any PC that Supports Hardware Virtualization. This will need to be enabled in your BIOS.

Once your Windows 7 OS is installed and patched, download the Windows Virtual PC add in from Microsoft and install. After a reboot you will have an extra entry in your START menu.

Monday, 23 November 2009

Windows 7 Sysprep and WDS

I decided to try the Sysprep process for windows 7 in advance of our roll-out early next year, to get a feel for the process.
UPDATE: I have added a new Blog Creating a Windows 7 Sysprep unattended XML with a breakdown of the unattended XML creation and configuration.
For the test base image, I want to create an "admin" image with administrative tools, AD, Exchange 2007 and SQL 2005 on 64 BIT Windows, to be used by the sys admins for further testing.

Upon searching, the majority of posts are Vista related, but this step by step guide was found to be very useful, particularly in creating the answer file using the WAIK (Windows Automated Installation Kit), and I would like to take this opportunity to thank Brian Lee jackson.